
Execute Workflow Process

This is configurable on both the Side Bar and Command Bar menu types.

Overview

A menu button can be configured to launch a specific Workflow Process.

A screenshot of a button that launches a process diagram. The button has an icon of a table, and the label: "Launch Process Run". The screenshot is annotated red to highlight the location of the button.

When a workflow is successfully launched, a confirmation box will appear in the bottom-right corner of the site.

A screenshot of the confirmation box that appears when a workflow is successfully started. The confirmation box is green with white text and a white x in the corner to dismiss the box. The white text in this example reads: "1 process runs started successfully"

If any Inputs are configured on the Workflow Process, the desired input fields will appear in a dialogue box before the workflow is activated.

A screenshot of the small window that appears below the button. There is a field and a single button. The field has the title: "Quantity" and the user has typed the value 500 into the field. The button is blue with white writing that reads "OK".

Once the inputs are entered and the user presses OK, the Workflow Process will be triggered.

Configuring a Menu Button to Launch a Workflow

  1. Navigate to the menu configuration screen of either an Item or the Sidebar.

  2. Create a new menu item by pressing the + New Menu Item button

A screenshot demonstrating the appearance and location of the New Menu Item button when editing a menu item. In this example this is editing a Command Strip menu item. At the top of the screenshot is the list of menu tabs for Designer when editing an item. Underneath, to the right of the "Save" button is the "New Menu Item". It has an icon of a + symbol and a downwards chevron indicating that it will open a dropdown menu. The screenshot is annotated with a red box to highlight the button's location.

  1. Select + New Blank Item

A screenshot that demonstrates the appearance and location of the "New Blank Item" menu option that appears in the dropdown menu from the "New Menu Item" button. The screenshot is annotated with a red box to highlight the menu option's location.

  1. Provide the menu button with its Display Text that will appear to the user on the button

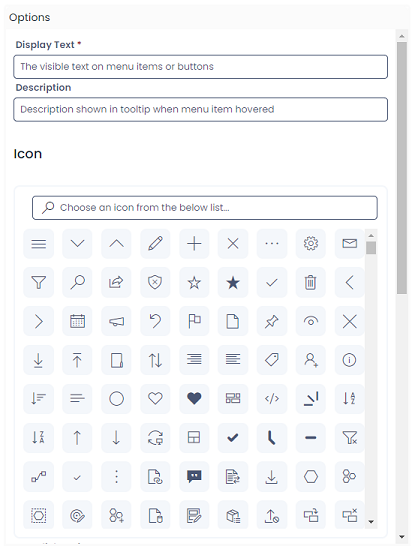
  2. Optional: Provide a Description of what the menu button will accomplish

  3. Optional: Select an Icon to describe the workflow action

A screenshot of the "Options" section of editing a menu button. The following fields are visible, with the descriptive text inside each field: "Display Text": "The visible text on menu items or buttons"; "Description": "Description shown in tooltip when menu item hovered"; and a large icon selection, where the user can choose an icon for the menu button.

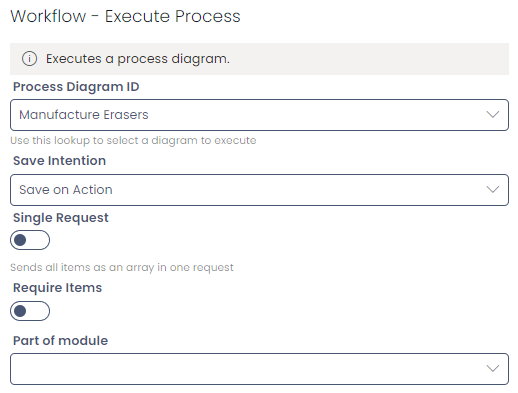
  1. Scroll down, and set the On-Click Action to Workflow - Execute Process

  2. Optional: If configuring a Command Strip menu button, set the location of the item (Both | Item | Table)

A screenshot of the "On-Click Action" choice field. In this example, it contains the value "Workflow - Execute Process".

  1. Scroll down to the Workflow - Execute Process section

  2. Select the Process Diagram ID to assign to the menu button

  3. Set whether the menu button will trigger a save interaction

A screenshot of the "Workflow - Execute Process" section. The section contains an info box with "Executes a process diagram." Underneath the info box are the following choice fields and descriptive text: "Process Diagram ID":"Manufacture Erasers", "Save Intention": "Save on Action". Beneath these fields are the following check fields: "Single Request", and "Request Items".

  1. Save the menu hierarchy

Now, when the menu button is pressed, it will trigger the configured Workflow Process